Welcome to the Anthill Guide on how to integrate Xero with Anthill!
Integrating Anthill with Xero allows you to create invoices directly from your Anthill system. These are then replicated in your Xero account.
This facilitates a more streamlined approach to keeping all required customer records in one, easily accessible location.
Your Anthill details are also needed to complete the process.
Linking Your Accounts
Access your Anthill account and navigate to the “Integrations” hub via the top right hand corner menu.
Find Xero and select “Settings” beneath the logo.
Here, you will see the below image. Select “Click here to connect to your Xero account”.

You will be redirected to a Xero page where you will be required to enter your usual Xero login credentials.
Depending on your Xero account configuration, you may be required to use the Two Factor Authentication (2FA) system.
This will mirror the standard Two Factor Authentication (2FA) system, sending a code to your registered device via the Xero Verify app.

Details of the information for which access is being requested will then display; you will need to select “allow access” to enable this.
Should you have more than one organisation linked to your Xero account, you will need to select the relevant company from the drop down menu.

Configuring Xero In Anthill
Once access has been allowed, you will be redirected back to your Anthill account.
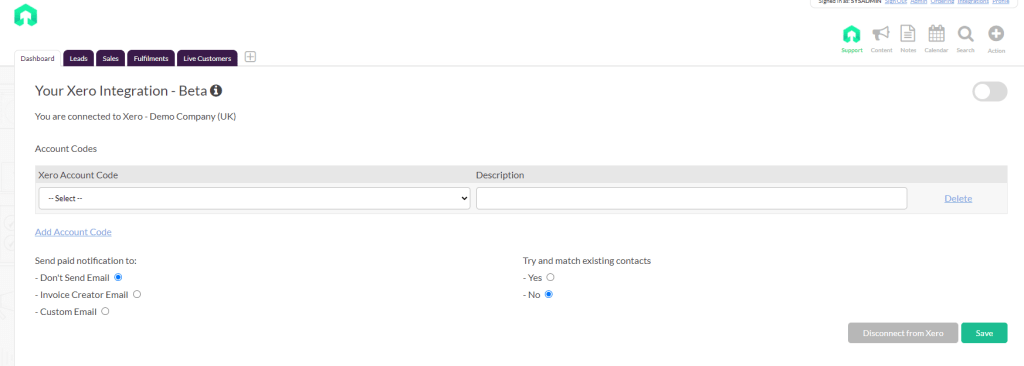
Here you will see the below screen from which you can select the “Account Codes” you wish to be made available when creating invoices via Anthill.
TIP: Only add the codes that are relevant for customer or supplier invoices. For example, codes for Advertising or Rates will never be used so avoid pulling down.

To add more than one code hit the “Add Account Code” button.
Below the account codes are two further configuration buttons.
“Send paid notification to” allows you to automatically send an email to the relevant individual when the invoice is marked as paid.
This can either be the person who created the invoice or a custom email which can be inputted at this stage.
The second button determines if invoices “try and match existing contacts”.
This association is achieved via alignment with existing Xero contacts for your organisation based on email.
Once all details are correct, hit “Save” and activate the integration via the slider toggle in the top right hand corner.
Should you wish to make any future changes, these need to be confirmed by clicking “Save” every time.
Once the Xero integration is activated, following your usual invoice creation process within Anthill will replicate the invoice in your Xero account.
The last option here is ‘Disconnect from Xero’. This will disconnect your Xero account from Anthill and you will need to ‘Click here to connect to your Xero account’ in order to re-link your account.
If you have any other Integration Queries, please visit the Integrations Hub or Contact Us directly.
- May 13th, 2021


