


Welcome to the Anthill Guide on user management.
If you have the appropriate admin permissions, you will see the ‘Admin’ link in the top-right of your screen in Anthill. Clicking this will present you with the admin options that are available to you.
Please speak to your CSM if you have questions about access.

Creating a New User
In the Admin area, the first option you will see is ‘Create New User’. Clicking this will take you into the User Creation screen:

Step 1 – User Details
Depending on your system setup, you may or may not have multiple User Types defined in your system. Speak to your CSM in the first instance about how User Types differ from one-another if it’s not obvious from how they are named. Most users will use a type of Standard.
The User Name must be unique. The recommended format is Forename.Surname – if you have multiple users with the same name it is suggested that you add a number to the end.
The First Name and Last Name fields will be how users will be referenced in the system, but also what could potentially pull through to Transactional or On Demand emails.
The Email field is how users will be notified if they have activity assigned to them (If this is configured in your system) and may also pull through to Transactional or On Demand emails.
Contact Number is an optional field.
Step 2 – Locations

This tab is where you determine which Locations the user has access to in Anthill. Locations in Anthill are typically stores or showrooms, but depending on your system configuration you may have Locations configured for departments, or different parts of the business.
Every user must have a Default Location. This location must also be checked in the User Locations tree above.
The User Locations tree can be expanded by using the ‘+’ button to see all Regions/Areas/Locations. Users can have access to multiple locations by clicking them individually at the lowest level, or ALL locations in a given Region or Area by checking the relevant name.
Giving a user access to Location(s) allows them to see and potentially interact with records created or assigned to said Location(s).
Step 3 – Permissions
The third tab determines which Permission set the user is assigned. A user can only be assigned to one Permission set. Permissions are only editable by Anthill, so please contact Support or your CSM if you wish to make any changes to these.

Step 4 – Save
Once you have selected the permissions, simply click Save from the bottom right of the screen.
You will then be presented with the following confirmation page.

IMPORTANT – before sending the invite below, click Edit User and tick the Licence User box.
Clicking SEND INVITE EMAIL will give you the options to select the email address to send the invitation email too.

User Data
If your organisation has an integration with an ERP or POS system, this tab can be used to store information for the user relevant to the third-party system. Speak to Anthill Support or your CSM if you have any queries about this tab.
User Licencing
User licences are the amount of users that you are paying for under your agreement with Anthill. You now have the ability to remove a licence from one user and give it to another. So, for example, if one user leaves the company and is replaced by another, you can deactivate the user assign the leaver’s licence to the new starter.
A users active status allows means they are available in the system to assigned activities.
A users licence status means they are a paid account and can sign in.
You can also have un-licenced users in the system. So if, for example, you pay for 15 licences, but you have 7 resources that don’t log in to Anthill (Fitters, Installers etc) you can create 22 users and leave 7 unlicensed. One reason you may want to do this is so you can book appointments against them in the Anthill Calendar.
To increase or decrease your licence, please contact Anthill Support or your CSM.
Assigning Licences
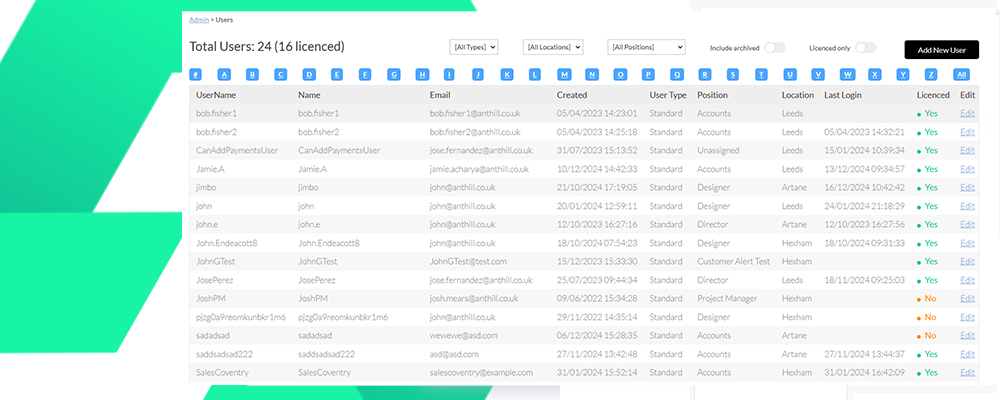
Access the Admin area using the link at the top-right of Anthill. Then click ‘Manage Users’ – you will see the screen below:

In the above section we discussed licenced and unlicensed users – in this example you can see there are 24 users in total, and only 16 licenced.
You can filter this list using the drop-down menus at the top for User Type, Location, Position, and choose to include Archived or Licenced/Unlicenced users using the sliders. The ‘Add New User’ button takes you to the ‘Create New User’ screen discussed above.
To unassign a licence from a user, find the user you require and click the blue ‘Edit’ link to the right of the row. On the ‘Edit/View User’ screen, uncheck ‘Is licenced user?’. Click the Save button at the bottom of the screen to submit the changes.
To assign this licence to another user, from the screen shown above, find the required user, click ‘Edit’ and then check the ‘Is licenced user?’ box.
If you reach the licence limit when applying a licence to a user account, you will be advised to speak to Anthill support. In this situation, you can create the user without a licence to save the information entered, then allocate a licence later.
Managing and Editing Existing Users
User Details
Here you can edit the main details for the user account, along with following additional settings:
| User must change password at next login | Check this to enforce the user to create a new password the next time they log in to Anthill |
| Generate temporary Password | Should a user forget their password, you can generate a temporary one for them. When they next log in using this password they will be prompted to create their own. |
| Is Change Manager? | This allows access to the ‘Change Request’ area in the Support section in Anthill. This allows them to create requests that affect the whole system, and so only be given to decision-makers within your business. |
| Is Support Manager? | With this permission you are able to view and interact with support tickets raised by all other users within your organisation. |
| Is Integrations Manager? | This allows access to the Integrations screen within Anthill, allowing the management with integrations such as Xero, DocuSign etc. This should only be given to select users. |
| Is basic admin? | Allows access to the Admin area as described in the second section of this user guide. This should only be given to select Anthill users. |
| Is licenced user? | This determines whether the user is utilising one of your paid Anthill licences or not. |
Deactivating Users
You may deactivate a user with the button at the bottom of the ‘Edit/View Users’ screen. This will prevent them from being able to log in. A deactivated user could potentially still use up a licence unless the ‘Is licenced user?’ box is unchecked also.
Impersonate Users
To help support your user base, it can at times be helpful to see exactly what they are seeing. Clicking the impersonate button from the view/edit user page will log you into Anthill as if they are logged in themselves. To come our of this mode, click stop impersonating from the admin menu

Please be aware: Any changes made while impersonating will be recorded as by impersonated user.
Reassigning Activity
This tab is mainly used when a user leaves the organisation, or goes on long-term absence, and activities need to be reassigned to another user in bulk. You cannot assign a given activity type to multiple users in this section, i.e. it is ‘all or nothing’. Speak to Anthill Support or your CSM for queries around best-practice in this scenario.

Account History
This tab is for information only. It shows a history of major actions carried out by Admin on their account configuration.
iCal Settings
This tab controls the certificate for users to sync their Anthill calendar into a third party Calendar.
Related Articles


- December 16th, 2024